Whole Roast Chicken Cooking Time: The Ultimate Guide & Calculator
Let's cut straight to the chase. The single biggest question holding people back from making a perfect roast chicken is: how long does it actually take? You're not alone if you've nervously poked a bird for an hour, unsure if it's done or dangerously undercooked. I've been there, and I've also served dry, overcooked chicken because I followed a generic "cook for 1.5 hours" recipe that didn't account for my smaller bird.
The truth is, a one-size-fits-all cooking time is a recipe for disappointment. A flawless roast chicken hinges on a simple formula: cooking time is primarily determined by weight and oven temperature. Get those two variables right, and you're 90% of the way to a juicy, golden masterpiece. This guide ditches the guesswork and gives you the exact tools and timing you need.
What's in This Guide?
The Foolproof Roast Chicken Time Calculator
Stop searching for vague answers. Use this table. It's based on the standard roasting temperature of 375°F (190°C), which is the sweet spot for even cooking and crispy skin. This is the data I wish I had when I started.
| Chicken Weight (lbs) | Approximate Cooking Time | Internal Temp Target* | Visual & Feel Check |
|---|---|---|---|
| 3 lbs | 1 hour 15 mins - 1 hour 30 mins | 165°F (74°C) | Juices run clear, legs wiggle freely |
| 4 lbs | 1 hour 30 mins - 1 hour 45 mins | 165°F (74°C) | Juices run clear, legs wiggle freely |
| 5 lbs | 1 hour 45 mins - 2 hours 5 mins | 165°F (74°C) | Juices run clear, legs wiggle freely |
| 6 lbs | 2 hours - 2 hours 25 mins | 165°F (74°C) | Juices run clear, legs wiggle freely |
*Measure in the thickest part of the thigh, not touching bone. The USDA recommends 165°F for safety.
Pro Tip from the Kitchen: These times are for a chicken placed directly from the fridge into a preheated oven. If you let your chicken sit out for 30-60 minutes to come closer to room temperature (which I recommend for more even cooking), you can shave about 10-15 minutes off the lower end of these ranges. A 4lb bird might be done in 1 hour 20 minutes.
What If My Oven Runs Hot or Cold?
Oven thermostats are notoriously inaccurate. If you're roasting at 400°F, reduce the time by about 15-20%. At 350°F, increase it by 10-15%. But honestly? Buy an inexpensive oven thermometer. It changed my cooking life. Seeing that my oven actually runs 25 degrees hot explained years of slightly burnt edges.
The One Mistake That Ruins Cooking Time (And How to Fix It)
Everyone talks about trussing or herb butter. The silent killer of a good roast chicken is crowding the pan. You pat the chicken dry, season it beautifully, put it in a pan with potatoes, onions, and carrots piled around it, and wonder why the skin is pale and soggy after an hour.
Here's what happens: those vegetables release steam. That steam creates a humid micro-climate in your pan, which is the enemy of crisp skin. The chicken essentially steams and roasts at the same time, throwing off your expected cooking time and texture.
The fix is simple: Use a wire rack inside your roasting pan, or even better, a cast-iron skillet. Elevate the chicken. Let the hot air circulate all around it. Roast your vegetables on a separate tray on a lower rack. They'll caramelize better, and your chicken will cook faster and more evenly because the hot air isn't blocked.
Your Step-by-Step Roasting Process
Let's walk through a real scenario. It's Sunday. You have a 4.5 lb chicken. Dinner is at 7 PM.
3:30 PM - Prep: Unwrap the chicken, remove giblets (check both cavities!), and pat it incredibly dry with paper towels, inside and out. This is non-negotiable for crispy skin. Season generously inside and out with salt and pepper. You can stuff the cavity with a halved lemon and a few garlic cloves for aroma, but don't pack it tight—it slows cooking.
3:45 PM - Pre-heat: Put your oven rack in the middle position and preheat to 375°F (190°C). No, putting the chicken in a cold oven does not yield better results for a standard roast. It just extends the cooking time unpredictably.
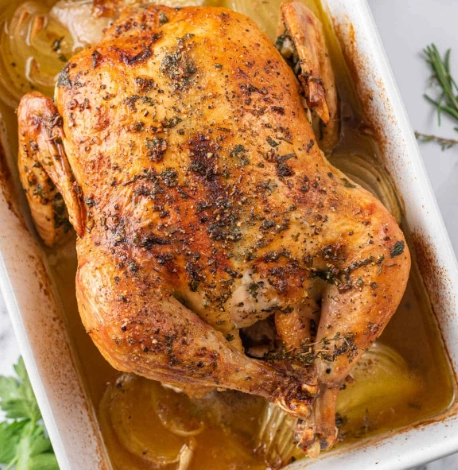
4:00 PM - Roast: Place the chicken breast-side up on a rack in your pan. Put it in the oven. Set a timer for 1 hour.
5:00 PM - Check & Baste (Optional): After an hour, the skin should be starting to color. If you're basting, do it now, and quickly. Every time you open the oven, you lose heat and add 5-10 minutes to your total cook time. I often skip basting—if the skin is dry to start, it will crisp up fine.
5:30 PM - Start Checking Temperature: For a 4.5 lb bird, this is when I get my instant-read thermometer ready. Insert it into the thickest part of the thigh. We're looking for 160-165°F. Remember, the temperature will rise 5-10 degrees while resting.
5:45 PM - Likely Done: If it's hit temp, pull it out. If not, check every 5-7 minutes. Do not wait for it to look "brown enough." Trust the thermometer. I've pulled pale-looking chickens that were perfectly done, and their skin crisped up beautifully during the rest.
How to Tell It's Done Without a Thermometer
I'm going to be blunt: you should get a thermometer. A basic digital one is under $20. It's the single best investment for meat cooking. But if you're in a pinch:
- The Wiggle Test: Using a towel, grab the end of a drumstick and wiggle it. It should move very freely in the joint, with little resistance.
- The Juices Test: Pierce the thickest part of the thigh with a knife or skewer. The juices that run out should be completely clear, not pink or red.
These methods are less reliable, especially for beginners. The wiggle test can be subjective, and clear juices can appear before the deepest meat near the bone is fully safe.
The Non-Negotiable Step After Cooking: Resting & Carving
You pull the chicken out. It's perfect. Do not carve it immediately.
Transfer it to a cutting board, tent it loosely with foil, and let it rest for 15-20 minutes. This allows the frantic, hot juices inside the muscle fibers to relax and redistribute. If you cut now, all those juices will flood onto your board, leaving you with dry meat. The resting time is part of the cooking process. Use this time to make gravy with the pan drippings.
Carving is its own art, but start by removing the legs and wings, then slicing the breast meat against the grain. There are great visual guides from sources like America's Test Kitchen that show the technique better than words can.
Your Roast Chicken Questions, Answered
Why does my roast chicken cooking time always seem longer than the recipe says?
Nine times out of ten, it's your oven temperature or the starting temp of the chicken. An oven that runs 25 degrees cool can add 20-30 minutes to the cook time of a large bird. A chicken straight from a 34°F fridge takes significantly longer to heat through than one that's been sitting out for 45 minutes. Invest in an oven thermometer and let your bird temper on the counter before roasting.
I followed the time per pound exactly, but my chicken is dry. What went wrong?
You likely overcooked the breast trying to get the thigh to temp. The breast cooks faster. The classic fix is to start the chicken breast-side down for the first 30-40 minutes, then flip it. This shields the delicate white meat from the most intense heat initially, allowing the dark meat to catch up. Or, spatchcock the chicken (remove the backbone and flatten it). It cooks in about 45 minutes flat, and everything finishes evenly.
Can I roast a stuffed chicken, and how does it affect the cooking time?
You can, but I generally advise against it for food safety and even cooking. A densely stuffed cavity acts as an insulator, slowing the heat's journey to the inner thigh. You must add a significant amount of time—often 30-45 minutes extra for a 5lb bird—and you must ensure the stuffing itself reaches 165°F. It's easier and safer to cook dressing separately in a dish.
My skin is rubbery, not crispy, even after the right cooking time. Help?
This almost always comes back to moisture. You didn't pat the chicken dry enough before seasoning. Or, you basted it too often with watery juices, re-wetting the skin. For guaranteed crisp skin, after patting dry, you can even leave the uncovered chicken on a rack in your fridge for a few hours or overnight. This air-dries the skin further. Then, right before roasting, rub it with a tiny bit of baking powder mixed into your salt—it changes the skin's pH and promotes incredible crackle.
Related Articles