Whole Chicken Cook Time: The Ultimate Roasting Guide
You found a great deal on a whole chicken. It's sitting in your fridge. You're ready to roast. But then the question hits: how long does this thing actually need in the oven? You google "whole chicken cook time," and you get a dozen different answers. 20 minutes per pound? 350°F for an hour and a half? It's confusing. I've been there. I've also pulled out what looked like a perfectly bronzed bird only to find pink, rubbery skin near the joints. Let's cut through the noise. Cooking a whole chicken isn't about memorizing a single magic number; it's about understanding the factors that change that number. Get this right, and you'll have juicy, flavorful meat with crackling skin every single time.
What's Inside This Roasting Guide
What Really Changes Your Whole Chicken Cook Time?
Forget the one-size-fits-all formula. If you blindly follow "20 minutes per pound," you'll be disappointed half the time. Here’s what actually moves the needle:
1. The Chicken's Weight and Shape
This is the obvious one, but it's not linear. A 3-pound bird doesn't simply take half the time of a 6-pounder. Heat penetrates from the outside in. A thicker, denser bird (like a 7-pound roaster) takes disproportionately longer for the heat to reach the deep breast meat near the bone. A long, slender bird cooks faster than a compact, round one of the same weight.
2. Your Oven's Actual Temperature
Here's a secret most recipes don't tell you: most home ovens lie. They cycle on and off to maintain an average temperature. An oven set to 375°F might swing between 350°F and 400°F. An old oven can be off by 25 degrees or more. I learned this the hard way after moving to an older apartment. My perfectly timed chickens were suddenly undercooked. A simple, standalone oven thermometer (costs about $10) is the best investment you can make for consistent roasting.
3. To Stuff or Not to Stuff?
Stuffing the cavity with bread, herbs, or aromatics is a classic move. It smells amazing. But it acts like an insulator, slowing down the heat transfer to the inside of the bird. If you stuff, you must add significant time—anywhere from 15 to 30 extra minutes for a standard bird. More critically, the stuffing itself needs to reach 165°F to be safe, which is harder to measure. My personal rule? I loosely fill the cavity with lemon halves, garlic, and herbs for flavor, but I don't pack it with a dense bread stuffing. I cook dressing separately in a dish.
4. Starting Temperature: Cold vs. Room Temp
Pulling a chicken straight from the fridge and into a hot oven is a common mistake. The cold center drags down the overall cooking process, often leading to overcooked outer meat while you wait for the inside to catch up. Letting the chicken sit on the counter for 45-60 minutes before roasting takes the chill off and promotes more even cooking. Don't worry—this short time at room temperature is perfectly safe for foodborne illness prevention.
Expert Pitfall: Relying solely on pop-up timers. Those little plastic gadgets that come pre-inserted in some chickens are notoriously unreliable. They usually pop at around 180°F in the breast, which is a surefire way to get dry, stringy meat. Toss them. Trust a real meat thermometer.
How to Calculate Your Chicken's Cook Time
With the variables in mind, here's a practical framework. This table is your starting point, assuming a standard, unstuffed chicken, placed in a preheated oven, starting from a not-ice-cold state.
| Oven Temperature | Chicken Weight | Approximate Total Cook Time | Target Internal Temp (Breast) |
|---|---|---|---|
| 350°F (175°C) | 3 lbs (1.4 kg) | 1 hour – 1 hour 15 mins | 155-160°F (68-71°C)* |
| 350°F (175°C) | 4 lbs (1.8 kg) | 1 hour 15 mins – 1 hour 30 mins | 155-160°F (68-71°C)* |
| 375°F (190°C) | 5 lbs (2.3 kg) | 1 hour 30 mins – 1 hour 45 mins | 155-160°F (68-71°C)* |
| 400°F (205°C) | 6 lbs (2.7 kg) | 1 hour 45 mins – 2 hours | 155-160°F (68-71°C)* |
| 450°F (230°C) (High-Heat Method) | 4-5 lbs (1.8-2.3 kg) | 50 minutes – 1 hour 10 mins | 155-160°F (68-71°C)* |
*Yes, you read that right. 165°F is the USDA's safe temperature for poultry, but carryover cooking will take it there. Pulling at 155-160°F yields incredibly juicier meat. More on this below.
Cook Times for Different Methods: Roast, Spatchcock, Slow Cook
Changing how you prepare the bird drastically changes the clock.
Traditional Roasting (Whole, Untrussed)
This is the classic method. The times in the table above apply here. The legs and thighs take longer than the breast, which is why positioning (breast-side up) and sometimes shielding the breast with foil late in cooking is helpful.
Spatchcocking (Butterflying)
This is my go-to method for a weeknight. You cut out the backbone and flatten the chicken. It exposes more skin to direct heat for better crisping, and, most importantly, it creates a uniform thickness so the dark and white meat finish cooking more evenly. Time savings: 25-30%. A 5-pound spatchcocked chicken at 425°F will be done in about 45-55 minutes.
Slow Roasting (Low Temperature)
Roasting at a very low temperature, like 275°F-300°F, yields unbelievably tender, almost fall-off-the-bone meat. The trade-off? The skin won't get as crisp without a final high-heat blast. Cook time balloons to 3-4 hours for a 5-pound bird. It's a set-it-and-forget-it method for a lazy weekend.
Pro-Tip: For the crispiest skin possible, regardless of method, pat the chicken extremely dry inside and out with paper towels before you do anything else. Moisture is the enemy of crispness. Then rub with oil or butter and season generously under the skin too.
My Foolproof Step-by-Step Roasting Process
Here's exactly what I do every Sunday for meal prep. It never fails.
- Hour 0: Pull chicken from fridge. Remove giblets. Pat obsessively dry with paper towels.
- Hour 0:15: Season cavity with salt and pepper. Loosely fill with a halved lemon, a head of garlic cut in half, and a handful of herbs (thyme, rosemary).
- Hour 0:20: Gently loosen the skin over the breast. Rub softened butter or olive oil mixed with salt, pepper, and herbs directly onto the meat under the skin. Rub more oil over the outside skin. Truss the legs with kitchen twine (optional, but makes a prettier shape).
- Hour 0:55: Place chicken on a rack in a roasting pan, breast-side up. Let it sit on the counter.
- Hour 1:00: Preheat oven to 400°F. Place oven thermometer inside to verify.
- Hour 1:20: Once oven is hot, put chicken in. Set timer for 60 minutes (for a ~4.5 lb bird).
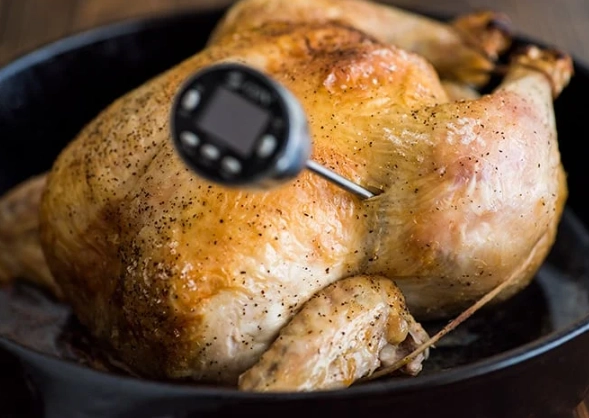
- Hour 2:20: Check temperature. Insert an instant-read thermometer (like a ThermoPop or Thermapen) into the thickest part of the breast, avoiding the bone. Also check the inner thigh.
The One Step Everyone Forgets: Resting Time
This is non-negotiable. When you pull the chicken from the oven, the juices are wildly rushing toward the surface. If you cut immediately, all that flavorful liquid ends up on the cutting board, not in the meat. Tent the chicken loosely with foil and let it rest for at least 15 minutes, ideally 20-30 for a larger bird. During this time, the temperature will continue to rise (carryover cooking) by 5-10 degrees, and the juices will redistribute. This is why pulling at 155-160°F is safe—it will coast to 165°F while resting.
I use this time to make a quick pan gravy with the drippings. Resting transforms a good chicken into a great one.
Your Roasting Questions, Answered
So, the next time you're staring down a whole chicken, remember: the clock is a guide, but the thermometer is the boss. Start with the estimated times, but let the internal temperature—and a good long rest—be your final judge. It turns a routine dinner into something reliably spectacular.
Related Articles